Chapter 4: Combat
Combat is the ultimate crucible where a Demigod's strategy, positioning, and raw divine power are tested against rivals and monsters. Every attack follows a rigorous, unbroken six-step sequence to ensure that every duel remains fair, transparent, and tactically decisive.
Step-by-Step Engage
When your Demigod or Minion initiates an attack, you must resolve the action by progressing through the following six steps in precise order:
-
Step 1: Declare Attack
- Target Selection: Choose your specific target (an opposing Demigod, an enemy minion, or a destructible environmental object) and announce the card or ability you are using to make the attack (e.g., a Battle Card attack, an Aggressive Spell, or a Consumable Item).
- Range Verification: Verify that the target is strictly within the required Range category for your chosen attack—whether that is Melee, Line of Sight (LOS), or Perception Range.
- Failure Condition: If the target is out of range, obstructed by impenetrable terrain, or invalid, the attack automatically fails. The card or ability used is immediately discarded into your discard pile, and your Action Point (SAP) is wasted.
-
Step 2: Declare Defense (Optional)
- The Defender's Response: Once an attack is legally declared, the defending player may choose to mount a defense. The defender has three options:
- Play a Battle Card: Play 1 valid Battle Card from their hand (costs 0 SAP) to match or exceed the incoming attack.
- Use a Reaction Ability: Play a specific, legal "Reaction" type card, spell, perk, or item from their hand or sheet that triggers when targeted (costs 0 SAP).
- Do Nothing: The defender accepts the attack raw; their Defense Value (DV) is treated as 0, leaving them completely vulnerable to the full incoming force.
- Priority and Resolution: Defensive reactions and responses must be declared and resolved immediately to establish the final defending parameters before any math is calculated.
- The Defender's Response: Once an attack is legally declared, the defending player may choose to mount a defense. The defender has three options:
-
Step 3: Calculate Values
- Attack Value (AV) Calculation: Combine the base value of the card, spell, or weapon being used with all relevant active bonuses.
- Formula: Base Card Value + Weapon Attack Bonus + Magical Trinket Modifiers + Spell Power / Guild Perks = Total Attack Value (AV).
- Defense Value (DV) Calculation: Combine the base value of the defending card or reaction with all relevant defensive resistances.
- Formula: Base Defending Card Value + Shield Defense Bonus + Armor/Trinket Resistance Modifiers + Defensive Spell Bonuses = Total Defense Value (DV).
- The Comparative Result: Compare the final numbers directly.
- Hit Condition: If the Total Attack Value is strictly greater than the Total Defense Value (AV > DV), the attack hits successfully.
- Miss Condition: If the Total Attack Value is equal to or less than the Total Defense Value (AV < / = DV), the attack misses entirely, dealing 0 damage.
- Attack Value (AV) Calculation: Combine the base value of the card, spell, or weapon being used with all relevant active bonuses.
-
Step 4: Resolve Damage
- If an attack successfully hits (AV > DV), calculate the net damage by subtracting the Defense Value from the Attack Value (AV - DV). You must then apply this incoming damage sequentially through the target's defensive layers in the following strict order:
- Damage Reduction (DR): Subtract any passive flat damage reduction values granted by active spells, perks, or heavy gear.
- Temporary AP (Magic Shields or Barriers): Deduct damage from active temporary Armor Points provided by magical barriers, wards, or spells (such as Mage Armor or Mystical Shield).
- Armor Points (AP): Deduct the remaining damage from the points on the target's currently equipped physical Armor or Shield. If AP drops to 0, the armor is Broken.
- Health Points (HP): Any remaining overflow damage bypasses all shielding and armor, directly subtracting from the target's core Health Points (HP) life total.
- If an attack successfully hits (AV > DV), calculate the net damage by subtracting the Defense Value from the Attack Value (AV - DV). You must then apply this incoming damage sequentially through the target's defensive layers in the following strict order:
-
Step 5: Check for Defeat
- Immediately after damage is resolved, check the target's vital thresholds. A character is instantly removed from the battlefield and considered defeated if any of the following three conditions are met:
- Their Health Points (HP) are reduced to exactly 0.
- Their accumulated Poison Ticks reach 20 or more (Toxic Overload).
- Their accumulated Disease Ticks reach 20 or more (Corruptive Decay).
- Immediately after damage is resolved, check the target's vital thresholds. A character is instantly removed from the battlefield and considered defeated if any of the following three conditions are met:
-
Step 6: Resolve After-Attack Effects
- Finally, resolve any lingering secondary triggers, text conditions, or post-damage mechanics specified by the card or ability. This includes effects such as forcing the target to move or push spaces, drawing extra cards from successful hits, applying status effects (like Vulnerable, Stunned, or Prone), or triggering item destruction clauses.
General Rules & Stacking Mechanics
When multiple spells, items, perks, or status effects interact on the battlefield, their effects must be resolved according to strict stacking and precedence rules to ensure fair play:
-
Same-Source Restriction:
- Effects, buffs, or debuffs that derive from the identical spell or item source (sharing the exact same title, such as two instances of Mage Armor cast by the same Demigod) cannot stack with themselves unless the specific card or item text explicitly states otherwise.
- If an identical spell or item effect is applied a second time to a target currently under its influence, the newer instance does not stack; instead, it refreshes the duration back to its full initial value while replacing or maintaining the existing magnitude.
-
Stacking Similar Effects (Cross-Source):
- Different effects originating from distinct sources that provide the same type of numerical bonus or modifier (for example, gaining +5 Armor Points from a Protection spell and +5 Armor Points from an equipped piece of physical armor) do stack together.
- Independent Timers: When cross-source effects stack, each individual instance tracks its own rotation timer independently and expires strictly based on its own separate duration.
- Note on Armor Precedence: When damage is applied, temporary Armor Points provided by spells or magical barriers are always depleted and reduced by incoming attacks before damage is subtracted from physical armor points provided by items.
-
Simultaneous Effects:
- A character can be affected by any number of completely unique spells, item enchantments, passive perks, or status effects at the exact same time without restriction, provided they do not violate the Same-Source Restriction or direct contradiction rules (such as mutually exclusive status states). Each unique effect runs its course and expires independently according to its own designated duration.
Range
- Self: Only affects the caster.
- Melee: Adjacent spaces (including diagonals). Note: Battle Cards are Melee by default.
- Line of Sight (LOS): A clear straight or diagonal line. Blocked by Terrain Objects or other characters.
- Perception Range: Any space on the battlefield; ignores distance and obstructions.
Area of Effect (AOE) & Spatial Hazards
Some spells, items, and spatial hazards (such as Sanctuary barriers, Tar-Flasks, Abyssal Sludge Flasks, or Font of Life) affect multiple spaces at once rather than a single specific target. Every character caught in the zone must defend or are affected individually. To place an AoE, barrier, or hazard zone on the grid cleanly, always use one of three precise placement patterns based on the card or item text:
- Point-Centered (e.g., 3x3 Smoke Bombs, Void-Core Detonators): You designate 1 specific square tile space within range as the center Point of Origin, which radiates outward into a symmetric 3x3 square grid area covering that central tile and all 8 immediately surrounding tiles.
- Target-Plus-Adjacent (e.g., Impact Potion Bombs, Duryin Stone Shrapnel): You target 1 specific character or space within range, affecting that exact target space plus all immediately adjacent spaces (forming a 3x3 area centered on the target).
- Grid-Intersection Placement / Corner Targeting (e.g., 2x2 Tar-Flasks, Abyssal Sludge Flasks, Sanctuary Barriers): Unlike standard targeting that locks onto the center of a single square tile, you designate 1 exact grid intersection (the corner vertex where four square tiles meet) as your Point of Origin. From that chosen corner point, you expand the multi-tile area (such as a 2x2 square or a wall barrier) outward into one of the four quadrants (Top-Right, Top-Left, Bottom-Right, or Bottom-Left) of your choice. The 4 full tile spaces that make up that chosen quadrant form your hazard zone or structural barrier.
Measuring AoE Reach: Line of Sight (LOS) vs. Perception
When placing any Point-Centered, Target-Plus-Adjacent, or Grid-Intersection AoE, the method of reaching your target depends on the governing rule of the ability or item:
- Line of Sight (LOS): You must trace a clear, unobstructed straight or diagonal line of spaces from your Demigod to the target space or space with the grid intersection. If a Terrain Object or character blocks your line, the placement fails.
- Perception Range: You completely ignore distance and obstructions. You may designate any space or grid intersection on the entire battlefield as your Point of Origin, regardless of walls, pits, or characters blocking your view.
Reactions (Spells, Perks, and Items)
Reactions are specialized, instantaneous abilities that allow a Demigod or Minion to break standard turn order and interrupt an opponent's actions. They represent split-second tactical responses, magical counter-measures, or reflexive defenses.
-
Strict Trigger Timing:
- Reactions cannot be declared or used at whim; they can only be played the exact moment their specific mandatory trigger condition is met (for example, "When targeted by an attack" or "When an opponent casts a spell within Perception range").
- If the trigger window passes without declaration, the opportunity to use that reaction is lost.
-
Priority & Resolution:
- The Golden Rule of Priority: Reaction effects always resolve before the action or effect that triggered them.
- For example, if a defender plays a Counter Spell reaction when an opponent casts an aggressive spell, the Counter Spell takes effect instantly, neutralizing the incoming spell before any card values can be calculated or damage resolved.
-
Execution Limits & Restrictions:
- The One-Reaction Limit: Only one reaction can be played per individual trigger event.
- No Reaction Chains ("No Reacting to a Reaction"): You cannot play a reaction in response to another player's reaction. The chain of interruption stops immediately at the first successfully resolved reaction.
- Defending Against Reactions: If a reaction takes the form of an attack, spell, or item effect that specifically targets your character, you maintain the legal right to play a standard Battle Card or defensive reaction of your own to defend against it.
Tactical Range Examples
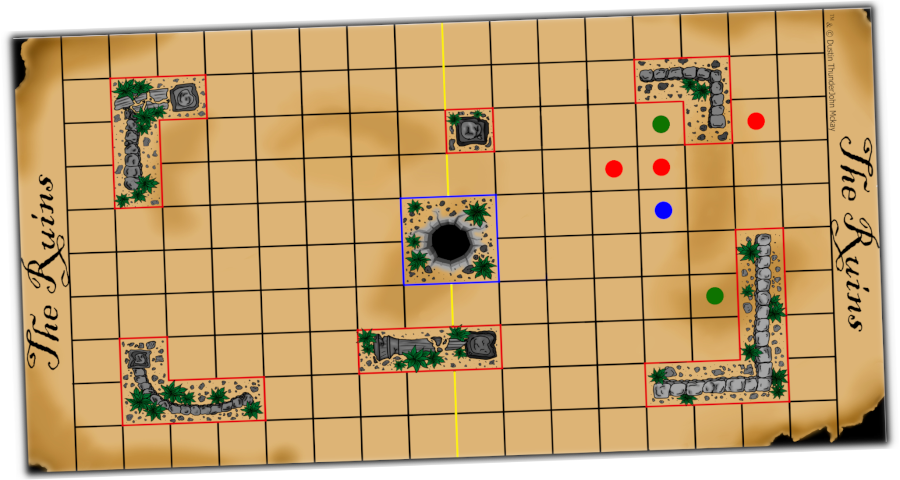
- *In these following examples, your demigod is the blue dot in the image above.
- Example 1: The 2 Red Enemies in Melee Range: The target is in an adjacent square (horizontally, vertically, or diagonally). You are "Engaged" and can use physical weapons.
- Example 2: The 1 Red Enemy in Line of Sight (LOS) to the upper right: The target is in a clear path. You can target them with bows or LOS spells. Note: Corners do not block LOS.
- Example 3: The 2 Green Enemies in Perception Range: The target is blocked by walls or other units. Perception spells manifest directly at the target’s location, ignoring all obstructions.